Blog
How to add Google Product Category in Shopify for Facebook Sync January 19, 2022 16:30
Have you logged into your Shopify account and had the following error on your home screen before?

And when you view the product issues it says that it is because the product doesn't have a "Google Product Category"?
You then look on the product's page to see where to input that information, and you can't find it?
Well, here is how you fix the issue.
I thought originally that the "Product Type" in the listing was what I needed to update, but once I updated that, it didn't fix my issue.

I finally searched just the right thing and found this article in the Shopify Help Center.
Essentially it tells us that in order for products to sync to your Facebook store and in turn to sell on Instagram all products must have a Google Product Category (GPC). When you first sync this is auto-filled for your products to help you get started. But when creating new products, this isn't always the case.
To edit this, you have to go into your Facebook sales channel.

Click on 'View all products' on the top left.

This will take you to the Bulk editor where you'll see a list of all your products. For each product you can see any errors, you can check if you want it available on Facebook (and Instagram), you can choose the Google Product Category, and you can note its condition.

You can either use the drop down menu to select a category or it will let you type in the search field to find one.
Once you've found the appropriate category and hit save (which takes a bit of time), you should be all set. When I fixed this issue for our gift tags, I was able to find them on Instagram to tag in a post within 5 minutes, so it syncs pretty fast.
The Benefits of Writing Things Down January 18, 2018 10:45

It’s no secret that we love paper products, from planners to books to cards sent in the mail. But there are many reasons that we’ll choose a paper product over technology for most things. Have you ever thought about why there is such a passion among Planner users? Why receiving snail mail means more than an email? Why you can remember a grocery list that was written down but have to keep referencing your favorite app for your typed list?
Here are just a few benefits of writing things down:
- You’ve probably heard before that writing things down on paper will help with memory retention, and it’s true. Many studies have been done proving better retention after writing something down - a lot of these specifically look at the differences between writing on paper vs. typing (and the results are no surprise!) Another plus is that writing things down benefits not only your short term memory, but long term and aging memories. See a few studies here and here for more information and science-y stuff.
- Writing things down allows for more natural creativity. Imagine a fresh sheet of paper, where you can easily branch off of ideas in different directions through graphs, doodles, lists, etc., compared to a standard notes app. There are of course, huge technological advances, and some programs that offer capabilities that closely emulate those achieved on paper - but there is really nothing like paper. The slowing down of having to physically create something instead of pulling from a stock makes you think more and ultimately make better decisions.
- Taking the time to write things down is more thoughtful. Whether it’s reflecting on your day, working, or writing a letter, the act of writing makes your brain work in a different way. On the other side of that - if you receive a handwritten letter, it inherently has much more meaning than receiving an email, because of the effort made in composing.
- Planning your day/ week/ month/ party/ etc on paper will help you with organization. For all the above mentioned reasons, your plans will run more smoothly with built in memory-retention and thoughtful decisions after writing them down. I’m not always at the top of my game, but I do stay closer to the top when I take the time to organize by writing.
- Writing things down allows your brain to rest. We’ve all had that feeling - a great idea or something important to remember, that has to be recorded. Writing that thing down and allowing for expansion then lets your brain rest, knowing that it can be examined further at a later time.
Writing something down on paper can lend significant advantages in many aspects, but of course we are modern women too, and use and appreciate technology. It varies from person to person, but using technology and physically writing on paper in tandem can possibly provide the best flexibility and practicality. Just like seeing a sunset in person is more fulfilling than seeing it on tv, physically writing and using more of your brain is more fulfilling and offers more benefits than typing. We’ll use technology, but we’ll also keep writing more and more.
Tutorial: How to Change the Weekly Start to Monday in Google Calendar and Outlook 2016 December 28, 2017 05:00
One of the upgrades to the 2018 UPstudio Planner we revealed during the Planning a Planner v2018 Blog Series was that all calendars in the 2018 UPstudio Planner start on Monday. The lack of consistency in the Sunday - Monday organization on the month layout vs the Monday - Sunday organization on the weekly layout started to really get to us with the 2017 Planner. We debated this change SO MUCH. You can read more about our thought process in Part IV of the blog series.
We understand that this change will take some adjustment. We will be adjusting along side you.
One thing we found useful was to adjust our electronic calendars to align with our planner so that all formats we use for planning our lives are consistent. (Yes, we own a planner business but still use electronic calendars for certain things, we have day jobs and are modern ladies.) We use Google Calendar in our personal lives and Outlook 2016 at work. Below we share simple tutorials to change the weekly start to Monday in both of those platforms.

Tutorial: Monday Start to Week in Google Calendar
Step 1: Access your calendar and in the upper right hand corner click on the gear symbol and access the 'Settings' dialogue.

Step 2: Click on 'View options' from the list on the left hand side. Then in the right hand list select from the drop down for the week to start on 'Monday'.

Step 3: Your settings will automatically save, so simply close out of settings and view your calendar to confirm the change has been activated.
Tutorial: Monday Start to Week in Outlook 2016
Step 1: Click on 'File' in the upper left hand corner and selection 'Options' from the list on the left hand side.

Step 2: Select 'Calendar' from the list on the far left and then under the 'Work time' heading there is a option to select the 'First day of week:'. Change the day to 'Monday' from the drop down and select 'OK' at the bottom of the dialogue box.

Step 3: View your calendar to confirm the changes were activated.
Pretty easy to modify in both platforms. This simple change has really helped us adjust over the past month, hopefully it will aid in your transition as well.
We hope you all had a very Merry Christmas and we wish you a happy New Year!
Ghosting and Bleed in Writing Instruments - and the UPstudio Planner November 9, 2017 05:00
Even if the terms 'ghosting' or 'bleed' don't mean anything to you, it's extremely likely that you've experienced both of these. We're not talking about Halloween or a convenient out from someone you're dating, we're talking about paper! Whether you're a paper lover like us (hi!) or new around here, this post is relevant to anyone who ever puts pen (or pencil or marker or crayon) on paper.
Let's start with some explanations:
Ghosting: the lesser offensive experience; ghosting is when writing shows up faintly on the back of the piece of paper where the writing occurred- you can tell that something has been written on the other side, but it does not interfere with anything and often times is not immediately noticeable.
Bleed: this can ruin your day; bleed occurs when ink has penetrated the paper and deters visibility on the opposite side of a paper where writing occurred- notes written on both sides of the paper can become very difficult to read.
The amount of ghosting or bleed that occurs depends on both the paper and the writing instrument. Some may argue that one or the other is the more important factor in the outcome of ghosting or bleed, but from our perspective, pens can be changed easier than paper can. It was extremely important to us when creating the UPstudio Planner to have both a balance of a quality paper weight (one that would allow minimal ghosting or bleed) yet not a lot of bulk or physical weight (small and light enough to carry around everywhere!) We met with our printers and tested all different paper types and weights with different pens and markers. In the end, we chose a 70# text paper which was the best of all worlds- and a much higher quality paper than many other planners on the market.
When the UPstudio Planner gets to you, you are in control of what you use to write. To help you avoid any ghosting or bleed issues, we tested 16 different writing instruments to see how they would fare on the Planner.
Here is our lineup (see below for written list):

And here are are the results:
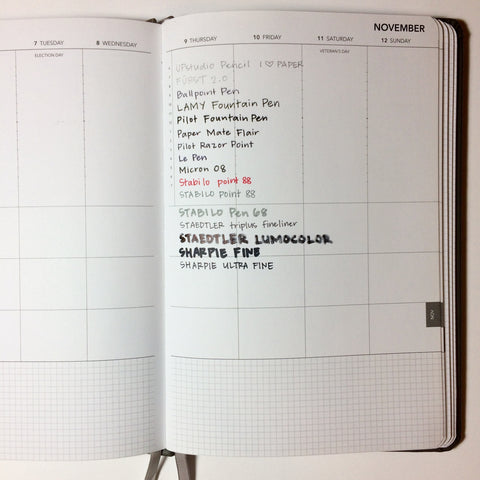

The takeaways from this test are that any pencil should work without issue (and as my schedule is constantly changing, this is my personal preference of writing instrument), as well as ballpoint pens. Felt tip pens may show some ghosting, but minimal at worst, and the type of fountain pen used will determine its overall quality (with fountain pens, my experience has shown that it's worth paying a bit more money for a much better product)! And finally, Sharpie's will bleed or have significant ghosting on almost all types of paper- there's a reason they are the best known permanent marker!
Have you used a different pen or marker and experienced ghosting, or bleed on your Planner? Or did we do an A+ job on choosing paper and you've had no issues? We'd love to hear your comments or see your results!
Tested writing instruments:
- UPstudio Pencil (we got the best ones, trust us)
- FURST 2.0 (pencil)
- Ballpoint Pen
- LAMY Fountain Pen
- Pilot Fountain Pen
- Paper Mate Flair (felt tip pen)
- Pilot Razor Point (felt tip pen)
- Le Pen (felt tip pen)
- Micron 08 (felt tip pen)
- STABILO point 88 - red (felt tip pen)
- STABILO point 88 - grey (felt tip pen)
- STABILO Pen 68 (felt tip pen)
- STAEDTLER triplus fineliner (felt tip pen)
- STAEDTLER Lumocolor (felt tip marker)
- SHARPIE Fine
- SHARPIE Ultra Fine
Lessons Learned: Change is a Good Thing - A Branding Update June 15, 2017 05:00
When you start a business, there are thousands of decisions to make. THOUSANDS. For 2 Type-A perfectionists like us, (hi there!) this was exciting and daunting at the same time. We wanted every decision that we made to be the right one, but realistically, it just won't work out that way.
UPstudio started with an idea - to create a simple, beautiful, versatile planner - and evolved into a line of high quality paper products. Before we could launch our products and ideas, we had to make some pretty big decisions on how to present them, including finding a name for our company, and a logo that would represent what we do. The name UPstudio has a deeper meaning than just the words themselves. "UP" stands for "Ut Prosim" which means "That I May Serve". This is the motto of my alma matter, Virginia Tech, and it's a standard that Mary Beth and I try to live by. We are a small company, but we want to make a difference by serving (stay tuned for more on this later this year.) UP is also a nod towards Heaven. Mary Beth and I are both Christians and our beliefs are the cornerstone of our lives, and our company. Studio is a direct take from our day jobs as architect and engineer. The idea of working in a studio is that you're constantly working to make changes for the better. Studio is playful and evolving and design oriented and devoted to studying. It was only natural to call ourselves a studio instead of "company".
After coming up with a name, we worked to come up with a logo. We evaluated a lot of different ideas, and eventually landed here:
![]()
We liked that it was simple, and compact. As the initial designer, I felt like our logo needed to be original and not just look like simple text. Fast forward 2ish years to now. As you have probably noticed, this logo is appearing less and less, and you're seeing this one more and more:
![]()
There are a few reasons for this change. One is simple logistics - the thin lines in the original logo are very thin. The thickness of the lines in the text of "studio" match the thickness of the lines in the middle of "UP". I loved how delicate they were, but printers hated it. The lines were just too thin, and didn't always read the way that we wanted them to, sometimes even getting completely lost. This made for an inconsistent logo (and a lot of heartburn with our local printer), and we definitely didn't love that. We worked around it as best we could, but when it came time to create the 2017 Planner, we came to a crossroads. We were intent on upgrading the binding and cover material to leather, and we wanted a simple deboss on the front and back of the planner - the back being our logo. Well, if a regular printer was inconsistent with the thinness of the lines, the deboss was downright impossible. This forced us to evaluate and talk about the logo, and as it turned out, neither of us was in love with it anymore. Maybe we never really were. As we continue to grow as a company, we're also growing and defining our brand. This even simpler logo, while still designed, is more classic and more versatile.
Eventually we will completely phase out the original logo, but for now, expect to still see a little bit of both of them during this transition period (and honestly, we still have products and business cards with this logo and as a small company, we can't just throw these things out!)
We feel good about the new logo, like it's more us. Sometimes it's hard to admit when you need a change, but then after it's said and done, the value is crystal clear. Take a look at the evolution of the UPstudio website from day one to today:

Want to read more posts like this one? Check out the Lessons Learned blog post series and learn with us!
Lessons Learned: Google Fonts in Shopify Store May 11, 2017 05:00 1 Comment
Each Shopify website theme has a list of available fonts built in to the template. We at UPstudio were personally struggling with the default font list. We just weren't happy with how any of them looked on our website. We had originally accepted that 'what you see is what you get' because we were, and still are using a free theme/template (the 'Minimal - Vintage' theme). We figured there are always sacrifices when you choose the free route. Eventually it bothered us enough that we decided to dig a bit deeper.
I, Mary Beth, am personally tasked with website development and improvement for UPstudio. I'm the first to admit that Google and the Shopify Help Center are my best friends when I am trying to solve a problem.
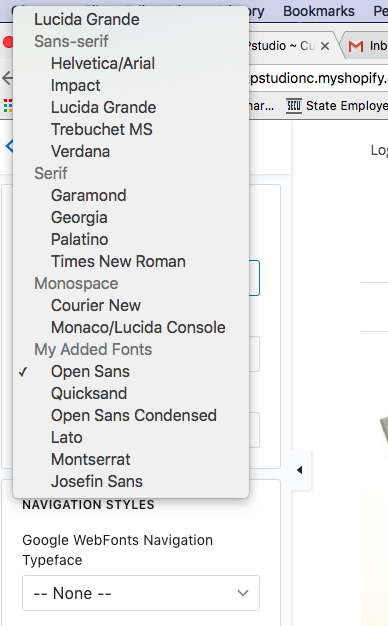
Luckily I stumbled upon a very simple fix for our font issue, Google Fonts. All Google Fonts are open source, so you are free to use them in your Shopify store. The Shopify Help Center has a great tutorial on how to add Google Fonts to your theme, check it out here. I wouldn't say these instructions are for the beginner, but they are easy enough to follow. The hardest part for us was deciding on a handful of fonts we wanted to test. Our best advice on that front is to make sure to look at all the characters and make sure they are all acceptable to you. Some have a rogue letter or number that really doesn't appeal to you, and that one letter ends up being on your homepage five times. When you drill down on a font in Google Fonts you can type in specific text to preview.
Our initial short list was:
Once you follow the tutorial once, it is pretty easy to replicate. That being the case, we added our complete shortlist to test them out. Part of the tutorial actually gives you the code to create a new group called "My Added Fonts" to help you easily locate them.
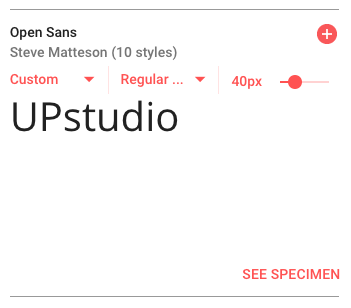
We ended up choosing Opens Sans. We aren't 100% satisfied but it is definitely an improvement.
We aren't coding gurus, but if you try out the tutorial and run into any issues, contact us, and we'll try to help.
The next step might be a custom font, we'll keep you posted.
Lessons Learned: North Carolina Sales and Use Tax March 30, 2017 05:00
As we have mentioned before, starting a business means you end up wearing a lot of new hats. Some are enjoyable and fulfilling and inline with why you starting your side hustle to begin with, others are more frustrating and take a lot of time because they are outside of your personal strengths.
Luckily since we are a partnership we can delegate 'new hats' based on our different strengths. And also luckily, our strengths don't overlap too much, so we can pretty evenly divide and conquer. The bulk of the business administrative side falls in my, Mary Beth's, wheel house. One of those pesky items is taxes. Today I was going to share what I've learned thus far regarding North Carolina Sales Tax, or more accurately "Sales and Use Tax".
I've set this post up as a question and answer that walks you through the process and answers some questions about North Carolina sales and use tax. If you have any additional questions, comment on this post or shoot me an e-mail. I'm no expert, the breadth of my knowledge is limited to how these taxes apply to our specific business, but I can help you find your answer, or point you to some resources that will help.

What is sales and use tax?
The North Carolina Department of Revenue overview:
"The general State and applicable local and transit rates of sales and use tax apply to the sales price of each item or article of tangible personal property that is sold at retail, sourced to this State, and is not subject to tax under another subdivision in N.C. Gen. Stat. § 105-164.4. Tangible personal property is defined in N.C. Gen. Stat. § 105-164.3 as "personal property that may be seen, weighed, measured, felt, or touched or is in any manner perceptible to the senses. The term includes electricity, water, gas, steam, and prewritten computer software." The general sourcing principles are set forth in N.C. Gen. Stat. § 105-164.4B.
In those instances where the appropriate sales tax has not been paid on taxable tangible personal property, a use tax applies to the tangible personal property purchased or received from within or without this State for storage, use, or consumption in this State."
Who should file sales and use tax in North Carolina?
Based on North Carolina law, every individual or business 'engaged in business' in North Carolina is required to collect and pay sales and use tax on retail sales or leases of tangible personal property and certain digital property not specifically exempt by law. Some services are also taxable. When they say 'engaged in business' I associate this with a physical presence. We live and are part of the business community in North Carolina. Most other states are similar. So we collect sales tax on every product purchased at a North Carolina show/pop-up (currently we do not have shows outside of North Carolina, that will be a new obstacle this year). For those of you coming to North Carolina to participate in a market from out of state, even if you don't have a brick and mortar in North Carolina, you are still required to register with the Department of Revenue and pay sales tax. You can read more about the specific requirements for 'specialty markets' here.
In regards to our online sales (includes sales directly from our website, Amazon, or Etsy), the tax required is based on the billing/shipping address of the recipient. So if the recipient is in North Carolina, we collect sales tax. If the recipient is in another state, where we are not 'engaged in business', we do not collect sales tax. The tax on that merchandise would be the responsibility of the purchaser as a use tax as required by their respective states.
For all of our products sold in local shops the retailer collects and files sale tax.
What is the difference between sales and use tax?
As indicated in the overview from the department of revenue above, sales tax is a tax collected on the sale price of each item or article of tangible personal property that is sold at retail, in this case specifically within North Carolina. Most people deal with this everyday, so it is easy to wrap your head around. Use tax is a little more tricky. The department of review defines use tax as "a tax due on purchases, leases, and rentals of tangible personal property and certain digital property purchased, leased or rented inside or outside this State for storage, use, or consumption in North Carolina." If you break it down it is tax owed by the purchaser of an item when the North Carolina tax has not been collected by the retailer.
An example of when we at UPstudio have to pay a use tax: When we get cards printed by our local printer we have to first purchase the cards from them. When we purchase cards we do not pay sales tax to the printer because we are purchasing them with intent to to resale (we provide them an E595-E form for the exemption). If we were to pay sale tax on the card, and then our purchaser also pay sale tax on the same card, that would be double taxation. So, we only collect and pay sales tax on the cards sold. But all of the cards we 'use'/consume ourselves, give away, or can't sell due damage or other reason and thus we store, we have to pay a 'use' tax on them. Since the retailer, or our printer, did not collect sales tax from us initially, it would then be our responsibility as the purchaser to pay it as a 'use' tax on the cards we are not reselling. The use tax is based on our purchase price from the printer.
If it still isn't really clicking, there is additional information on the North Carolina Department of Revenue website about use tax. The FAQs I found particularly helpful.
What are the current sales and use tax rates?
This webpage gives the current sales and use tax rates. Use tax is calculated at the same rate as sales tax. How sales tax is broken down is that you have a state rate and a county rate. The state rate currently is 4.75% and each county varies, refer to this document for the current county rate. Make sure to note the footnotes regarding additional county transit taxes. Wake County approved an additional 0.5% transit tax starting April 1, 2017. To simplify it a bit, you can reference this page to look at the total sales tax (state and county combined) for each county. But note that when filing your sales and use taxes there are separate line items for the state portion and each county portion.
When do you file sales and use taxes?
If the tax owed is between $100 and $20,000.00 a month you must file it monthly on or before the 20th day of each month for all taxes due for the preceding calendar month.
If you aren't a high roller, and fall in our category of less than $100 of taxes due a month you can file quarterly. These returns are due on or before the last day of January, April, July, and October for the preceding three-month period. You can read in more detail about when to file here.
Their website also released a directive stating that "North Carolina will consider any tax payment with a due date on a Saturday, Sunday, or legal holiday as being timely paid if delivered in person or mailed to the Department on the next business day after the Saturday, Sunday, or legal holiday." You can read more details here.
How do you file sales and use taxes?
You must first register your business with the North Carolina Department of Revenue. This is pretty simple on their website. You will get your sales and use tax account ID immediately upon application. They will also send you a certificate of registration which you are required to present to patrons at local markets/pop-ups.
We file our sales and use tax online electronically through the state's e-file system. You can access the system here. In preparation to file electronically make sure that you have all of your gross receipts for the month/quarter. Make sure that each receipt is broken into product price, state tax collected, and county tax collected. You'll be asked to break it down per county on the form. Also make sure that you have your sales and use tax ID number and your Federal Tax ID or EIN handy.
I've tried to cover the basics, hopefully this will help you start to understand how sales and use tax works and whether or not you should be collecting and paying it. There is plenty of additional information on the North Carolina Department of Revenue website, just follow the links provided within the post above. Please reach out to me if you have any additional questions or if something I said didn't quite makes sense.
Lessons Learned: Check The Mobile View March 2, 2017 05:00
Desktops and laptops are quickly taking second fiddle to the cellphone. People are using their mobile devices to do more and more on the internet everyday. Case in point: one day last week we printed shipping labels, invoices, and fulfilled orders from my cellphone.
This particular lesson learned is kind of a no brainer, but it is still something we have to remind ourselves all of the time: ALWAYS CHECK THE MOBILE VIEW OF YOUR WEBSITE AND E-MAILS!
Every tweak you make has to be considered from the perspective of all viewing platforms. On many occasions, even though the new website tweak / addition looked amazing on our computer screen, we had to make adjustments in order for the mobile view to be functional. Sometimes this came at a cost to the computer screen perspective, leading to a final decision that was a little less amazing but bridged across platforms. Here is one example:
On the 2017 UPstudio Planner page we have a viewer loaded that enables you to flip through a sample of the planner to get a feel of the layout:

Do you notice how the viewer looks a little small? It doesn't align with all of the other text when viewing it on your computer screen? However when you view this same section on your phone it all aligns perfectly:

Originally when we loaded this viewer, we customized the size to fit your computer screen, and we thought it looked great:

But this meant that on your cell phone in most cases it exceeded the screen width and required you to scroll left and right, making the navigation not as seamless:

Since we haven't figured out how to write code for this view to change sizes based on the viewing platform (on our list for the future), we had to decide what was a higher priority. In this case, the mobile view won, and the viewer looks a little small on your computer screen, but it is easy enough to click to enlarge.
Over the past few months I've saved other examples I've run across. Some of these examples are pretty large companies, so don't beat yourself up next time you come across something on your site you forgot to check out on your mobile device, it happens to us all. I'm sure all of these look great when you're sitting behind a computer screen.
For your viewing pleasure:


Lessons Learned: HTTPS February 16, 2017 05:00
Have you ever noticed that some web addresses begin with "http://" and others start with "https://"? What is the difference?
It means that the website is either using HyperText Transfer Protocol (HTTP), or HyperText Transfer Protocol Secure (HTTPS). Again, what is the difference?
Around the origination of the world wide web, network administrators had to determine how to share information that they put on the internet. They agreed to use the HyperText Transfer Protocol (HTTP). Eventually everyone understood this protocol and how it exchanged information, which lead to intercepting information. To battle this issue, the administrators agreed on a new procedure HyperText Transfer Protocol Secure (HTTPS) to protect the information. In short, the data being sent is encrypted using a "code" that is only known by the sender and the recipient. If anyone intercepts the information, they won't be able to decipher it because they won't have the "code". The computer on each end uses a document called an SSL Certification (Secure Sockets Layer) containing character strings that are the keys to their secret "codes".
Typically your browser will identify clearly which sites are secured.
You can see that we at UPstudio use HTTPS...

We are fortunate enough that our website host provides us an SSL Certification as part of our monthly subscription fee, thank you Shopify. It is however something that each store must activate. We recently received an e-mail from Shopify saying that all stores are required to activate their SSL Certificate and migrate to HTTPS by March 1st, 2017, or it will be done by Shopify automatically. For directions to activate, click here.
During the activation process you are required to fix any errors that prevent the encryption process. In short, all links found on your website must be to other secure (or https://) websites. You will be required to fix these "mix content errors". Shopify provides some guidance to aid in understanding and fixing the errors found.
When we were upgrading we kept being directed to pages where we couldn't find any errors, all content and links were referencing secure locations. We finally figured out that it was our newsletter sign up, which is in the footer of our website template, and therefore shows up on all pages. So this lesson learned is for all of those Shopify stores using MailChimp as their newsletter provider that are having issues with activating their SSL Certification. There is a very simple fix that worked for us.
When we first set up our theme and included a newsletter sign up in the footer we followed the directions at the bottom of this page to provide the MailChimp form action url. Which meant that the url we entered appeared like this:
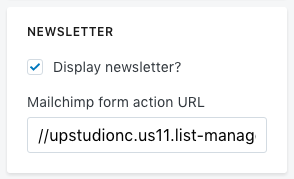
The simple fix is to just add "https:" in front of the provided form action URL, so that it appears as follows:

It is that easy!
For more lessons learned, click here to view our blog series. Have any questions for us about how we approached/accomplished something? Comment below or contact us, we are firm believers of collaboration over competition.
Lessons Learned: Starting a Business With a Friend October 6, 2016 05:00
"Should I start a new business with a friend?"
Mary Beth and I have been asked this question multiple times because this is exactly what we did with UPstudio. We are in a unique position, since we work together in our day jobs, so in actuality, we had been working together for years prior to the founding of UPstudio. We knew we worked well together because of that, and because of our friendship. But, we have given a lot of thought to this question since we've been working together. Our short answer is yes, start a new business with a friend - with the huge caveat that it has to be the right person. Starting a business is kind of a big deal, and there are a ton of factors that go in to it - more than we realized when we started out. During a 'Real Talk' interview that we did with Earn Spend Live, we discussed a bit about what it's like to work with a friend and if we would recommend it. The article touches on a few points, but here are some more in depth thoughts that we highly recommend considering before you jump in with a partner:
Do you like this person?
Seriously. This seems like a silly question, but you have to take into account how much time you'll be spending together... even when you're not together, you're still communicating all day long. MB and I often text early in the morning, talk on our lunch breaks at our day jobs, and then text / call / skype again in the evenings. We have meetings on nights and weekends, and we go to festivals and shows together where we sell our products. You're basically committing to a level just below marriage, so make sure you actually like your potential business partner.
Do your goals align?
What does the idea of this business mean to both of you - is it a hobby? A career? A creative outlet? If you're not on the same page with where your business is headed, then it could be an awkward and unfair division of responsibilities. In addition to your business goals, you need to consider your overall life goals (this sounds intense, but hear me out) - for example, MB and I both have families with small kids, and it's extremely important to both of us that even if we dedicate a lot of extra time to UPstudio, our families are always still our top priority. If you start a business with someone who has kids and you don't, then there's the potential for things to feel a little one-sided on occasion. MB and I are also both Christians, so we know that our top priorities outside of working together always align.
Do you work well together?
This is another one of those questions that seems silly to ask yourself, but it is a legitimate question. You might like someone, but not be able to work with them. If you don't agree on something, will you be able to work it out and make a compromise? We make all kinds of decisions for UPstudio on almost a daily basis. Most of the time we agree, but sometimes we don't. In those instances, we take the time to understand each other's point of view, and are able to make an informed decision from there. In the end, we're always both on board with whatever decision is made. As mentioned above, MB and I have the unique advantage of working together in our day jobs. I am an architect and she is a structural engineer, so we've coordinated a number of buildings together, and we knew from that experience that our communication was open and we are able to solve problems together.
Do you have the same financial goals and responsibilities?
Starting a business isn't free. There are a lot of legal things that need to happen before a business is official (but that's all for another blog post!) but even if your business is something like running an Etsy store, there is generally always some sort of cost associated with what you're doing. Who purchases supplies for your product? Marketing and promotion materials? Money is a sensitive area, so you want to make sure that you and your partner are either 100% equal on what is invested, or that you are both 100% comfortable with the division of financial responsibilities (but we recommend the 50/50 split!)
Do you both have passion for your business?
This one is pretty simple. If you aren't both willing to give it 100% most of the time, then you probably shouldn't start the business. It's pretty obvious that if one person feels 'meh' while they other one is 'YES' then whoever is less enthusiastic will continue to be less enthusiastic, leaving majority of the work left for the other person. You have to love what you're doing for there to be a future, or for starting a business to make sense in the first place.
Do you have a balance of responsibilities?
When we were first kicking around the idea of creating UPstudio, MB and I sat down and talked about what each of our responsibilities would be. MB shared that she was much more interested in the business side of things, including accounting, determining which website host would be best, writing code, etc, while I was much more interested in the design and creation of our products. This does not mean that the other one of us is not interested in the other side and that we don't invest effort in those things too, but it gave us a pretty clear division of responsibilities that just happened to work out perfectly. One of us will generate an idea, whether it's business or design related, and the designated person will run with it, then we'll meet again to talk about it, make changes, and finalize. Basically, it's a huge team effort with our main roles defined. Another note about working with a partner is that life happens. Sometimes you just can't make things work with your personal schedule, and that is to be expected. When you're working with someone that you can count on, they can help pick up your slack when you just can't do it. MB and I have each had babies in the short time that UPstudio has been founded, and during those times, one person is clearly doing that majority of the work - but we're happy to do that for each other, because we know that we'll get that same effort in return when something comes up for us, no question.
All in all, working with a partner is great. They can inspire you, challenge you, and share all the joys and struggles of running a business. You're also held accountable when someone is counting on you - I believe you have more of a chance of being successful in a business with a partner - the right partner. I know I have the right one for this! (awwwwwww)

Awesome outtakes from a photo session earlier this year
Planning a Planner v2017, Part I August 4, 2016 08:00 2 Comments
First off, we appreciate all of the honest feedback we received regarding the UPstudio 2016 Planner. Thank you to everyone who took the time to respond to our inquires and share your thoughts. We are genuine when we say that we are always looking for areas to improve and grow. So please, never hesitate to shoot us an e-mail or contact us via social media, we would love to hear from you.
UPstudio was founded on the idea of creating a planner that is affordable, attractive, versatile, and fit for people in all walks of life. We have tackled a lot of other fun projects along the way, but our planner is still our main focus. 2016 was the inaugural year for the UPstudio planner. We are proud of what we were able to create. The process was challenging and we learned a ton. Over the next month as we ramp up for the UPstudio 2017 Planner release we will be sharing some of the behind the scenes work in a four part blog series, "Planning a Planner v2017".
We featured a similar series last year, Planning a Planner, where you can read all about the hard work we put into getting the 2016 planner off the ground. We won't go into all of the details here, but feel free to refresh before we get started.
For the 2016 planner, the bulk of the decisions we made were based on personal preferences, our experiences with previous planners, and a focus group we had try out a sample. Our inaugural year was tough because we were creating something out of nothing, pulling all our ideas together and making what we thought were the best decisions.
When our creation finally arrived, we first gave ourselves a pat on the back and showed it off to everyone because we were so proud, and then we started critiquing it and seeing the imperfections, or should we say room for growth. Having a product in your hand to improve upon is significantly easier than starting from scratch. We aren't saying that this year has been a cake walk, but hopefully each year will continue to get easier as we have more experience under our belts and more lessons learned.
The two areas of improvement we are going to focus on today are the cover and the binding, because they kind of go hand in hand.
We heard you all loud and clear, and we completely agree with you, that the 2017 planner needed a cover that was more durable. So we started researching more sturdy materials that were acceptable cover types with the wire-o binding. The options were limited, which lead us to question our binding choice. The binding was a little bigger than we expected, the way it connects allowed the back cover to become detached, and it made it hard to write on Wednesday (or Thursday for those lefties out there). But what were our other options, and would those options give us a more durable cover? We also didn't want to compromise on the appearance of the binding, or sacrifice the ability of the planner to lay flat.
After a lot of research (and really I'm skipping over MONTHS here) we decided to go with a smyth sewn binding (sometimes called section sewn), which is a type of hardcover binding. For those of you familiar with Moleskine notebooks, the binding is very similar.
A simplified version of how this binding type works:
Your book is printed booklet style in 16 or 24 page sections called signatures. Those signatures are folded in half and sewn together along the folds. A spine is glued to set the thread and edges of the signatures. The collection of signatures is called a text block. Finally the cover material is adhered. (Timelapse of process.) We pulled apart an old notebook to help you visualize:

This is the complete text block. You can see all of the individual signatures adhered to the white spine. The ridges seen along the spine are where the thread passes between signatures.

Here we have pulled back the white spine exposing one of those "ridges". As we pull apart each signature you can see how they are threaded together. There are many different stitch types and threading styles used in smyth sewn binding.

Here we have opened to the center of one of the signatures. You can see how there are two pieces of thread that pass through the fold, one connecting the signature to the proceeding signature and one connecting it to the following signature.
Just last week we received our printed sample of the 2017 UPstudio Planner with the new binding!!!

So sleek, right? The cover will be debossed similar to the 2016 UPstudio Planner with a simple 2017 to add a little character and make it easier to distinguish. But the final product will be almost identical to the one pictured above.
(Such a big reveal, totally worth reading through all that wordy stuff at the top of this post, right?)
The benefits of this type of binding in regards to the UPstudio planner:
- The cover is a thicker chipboard compared to the 2016 planner and it is covered with a durable gray leather making it significantly more sturdy.
- This type of binding in comparison to the standard hardcover binding gives the planner the ability to lay flat (so no sacrifice there).
- Aesthetically we find the binding just as pleasing as the wire-o binding. Honestly, I think we'd rank this higher.
- The planner seems more gender neutral.
- The back cover can no longer escape.
- Writing on Wednesdays (or Thursdays) will no longer be a struggle.
- The new binding type made it easier to add an elastic closure mechanism.
- We were also able to add two ribbon markers to assist in turning right to the page you desire.
Overall we feel switching to the smyth sewn binding type is a huge improvement. There is one semi-downside/challenge that presented itself, but we'll leave you in suspense and discuss that in next week's post.
This is a pretty major change, we would love to hear your thoughts. Good? Bad?
(Congrats, you made it all the way to the bottom! Dedication! As your reward, $5 off the 2016 UPstudio Planner with code HAPPYPLANNING. Valid through Sunday, 8/7 at midnight. Yes, that means a planner for $5!)
Lessons Learned: UPS Mailbox vs. PO Box July 7, 2016 08:00 68 Comments
Soon after starting UPstudio we realized that a permanent address would really help us for a few reasons:
- Privacy (not having to use our personal addresses)
- Having a place that customers could return items (thankfully this hasn't come up yet).
- With all the paperwork involved in starting a company, we wanted to keep track of which address we submitted things under. Having only one is definitely easier.
- With our crazy lives, things sent to our houses might get overlooked.
- Having an address listed on your website makes it seem more legit.
- Most importantly, a place that people could send us notes of encouragement! (sadly, this hasn't come up either - but you could change that!!)
Our day jobs are on Fayetteville street in downtown Raleigh so we wanted a "permanent" address we could walk to, so that checking it wasn't inconvenient.
That left us with two options, PO Box or UPS Mailbox?
So we did the research (read a lot of online sources and the fine print of the rental agreements) and decided that we wanted to go with a PO Box at the Post Office. Being a start up, the biggest factor was price. Here is a comparison (these are for the downtown Raleigh locations, so prices might be different where you live):
USPS PO Box Pricing (search for local prices here)

UPS Mailbox Pricing (find a location near you for pricing)

The small, medium, and large boxes are comparable in size to the 1, 2, and 3 sizes respectively. The UPS Mailbox is significantly more, more than 3 times.
There were a lot of other pros and cons discovered in our research, but we thought based on the price we could live with the other limitations of the PO Box. So, we signed the papers, and took a pretty picture...

We canceled it within 3 months.... and secured a UPS Mailbox. Why you ask?
Let us share the lessons we learned and the benefits of the UPS Mailbox:
- After deciding on the PO Box we went through all of the UPstudio paperwork we had already filled out to change our address. We quickly noticed fine print that didn't register before "we do not accept PO Box for address", with one of those locations being our bank which was a big one, because we wanted a billing address that was consistent as well. With a UPS Box you have a physical street address rendering it acceptable to be used. Your mailbox is just identified by a suite number.
- One of the biggest differences is how packages are handled. At the post office, if you have a package that won't fit into your box they will not hold it for you behind the counter unless it was shipped by USPS. They will not hold packages shipped by Fedex, UPS, or other carriers. They also won't hold anything that must be signed for - a big predicament. The UPS store can accept any package size and will hold it for you either in a larger holding box or behind the counter. The owner of our local UPS store said she will accept packages as large as pallet size deliveries. They will sign for your packages as well, uber convenient. They also send you an e-mail or text whenever a package has been delivered. UPS is the clear winner in the package department.
- To continue on the package note: Being a paper/stationary type store, we were concerned that returns would get crammed into our small box therefore rending the products unusable for repurchase or that products shipped to us for resale would suffer the same fate. Our small UPS store is locally owned and operated and we were assured that they would pay close attention in hopes of avoiding this issue. So far we haven't been disappointed on this front.
- UPS provides mail forwarding for a small additional fee. So, if our day jobs move away from downtown and our "permanent" address is no longer convenient, we can choose to have all our mail and packages forwarded to another address while still keeping our current address as a front. This way we wouldn't have to update all of our accounts or re-brand. This service is not provided by USPS for PO Boxes.
- This one is personal preference: A street address provides your company with a bit more of a professional image when compared to a PO Box. Wilmington Street is a prominent downtown Raleigh street, so it only helps our legitimacy.
- At the Post Office the PO Box lobby hours are limited to 6am-5:30pm M-F, and 6am-12pm on Saturdays. The UPS store hours are 8:30am-6:30pm M-F, and 10am-2pm on Saturdays. The later hours of the UPS store are more convenient with our routines. But here is the kicker, you have the option at the UPS store to pay a one time $25 fee to get a 24 hour access fob.
- If you are a AAA member most UPS stores provide a discount on certain mailbox packages, so make sure to ask.
- Think about what your company name is, or who you will be getting mail sent to - for us at UPstudio, there has been confusion at times with the first three letters of our name being 'UPs', where our mail was accidentally opened by UPS employees. This was resolved after some clarification and more careful reading before opening anything.
- One last thing, if you make the same mistake we did and snag a PO Box prior to understanding all of the limitations, USPS has a refund policy:

When we were doing our research there were many mixed reviews and a lot of grey area and unanswered questions. We decided to take the risk due to the price and see how it actually turned out. In the end, it wasn't he best decision we made, but since we tried the cheaper option first we weren't out a lot of money. Hopefully the lessons we learned will be helpful to you and your company.
If you want to send us some snail mail, you can reach us at:
UPstudio
324 S. Wilmington Street
Suite 226
Raleigh, NC 27601
(so professional and legit sounding, right?)
Not as pretty, but definitely more equipped to handle our needs...

So, this was basically all a ploy to get our first letter of encouragement, can you tell? Were we too subtle?
Lessons Learned: Free Shopify Apps to Install June 9, 2016 08:00 2 Comments
First off CONGRATULATIONS to Lynn B., you won the BEST GIVEAWAY EVER! We are super excited for you to check out all of UPstudio's new products and will be in touch shortly!
For those of you out there that also use Shopify as your website platform hang around to read up on some FREE apps we have discovered that might help you out. For everyone else, have a great rest of your week and weekend! (And sorry if you didn't win the giveaway, but don't worry, there will be more giveaways soon!)
Lessons Learned: Free Shopify Apps to Install
Let us first set the scene: we are a fairly young start-up company that is fully funded by our two families, so we are very price conscious. We do a lot of shopping around to make sure we are getting the best deal. We chose Shopify as our website platform after a lot of extensive research (we'll share more about this in a future post). We chose to use one of their templates when setting up our store which means that we can't control some things we would like to in regards to its appearance, but we knew there would be limitations. We try to overcome these with installing apps. We spend a lot of time researching said apps because we need them to be FREE and flexible enough to match our website template. Now that you know where we are coming from, we'll share the free apps that we have come across that are currently installed on our site. We've provided a brief overview of each app. If you have any specific questions either leave a comment below or shoot us an e-mail.
MailChimp for Shopify by MailChimp
We are big fans of MailChimp. We can write a whole separate post about all the ways we utilize MailChimp and how well it syncs with all of our other platforms (let's be honest, you'll probably see this in the future). By connecting your Shopify store with your MailChimp account....
During the checkout process, Shopify asks your customers if they are interested in receiving marketing information from your store. When a customers completes an order at your store and has agreed to marketing, MailChimp for Shopify will automatically subscribe them to your MailChimp list. In addition, your customers are added to a static segment called "Shopify Customers", so that you can easily target email campaigns to only your customers.
Yotpo Reviews by Yotpo
Not sure about you, but we both read reviews of products prior to purchasing items pretty religiously. We decide not to splurge often after reading reviews. Honestly, a seller is always going to share all the good aspects of their product in the product descriptions, but the customer reviews are going to be a bit more straightforward, and will include the good and the bad. So we wanted a way to add reviews to our website. It is hard to trust new companies, you aren't sure what kind of quality to expect, so we wanted customers to be able to share their experience, and hopefully help new customers feel more confident in their purchase and in us. Yotpo was the answer. The free version does the basics. It sends e-mails to customers asking them to post a review. You have minimal customization, but you can customize the e-mail verbiage, and the review colors on your website to match your aesthetics. We highly recommend it, here is a sample from the UPstudio planner page. (And if you need more customization the upgraded version (not free) appears to have a lot of cool features.)

Shopify Digital Downloads by Shopify
Have you checked out our free downloads section yet? (You should!) The Shopify Digital Downloads App has been great so far. After creating a product it is really easy to associate it with a download file you have uploaded to the app. If you list it as free, your customer will still have to go through checkout, just won't have to input any payment information. After completing their order a download option will appear similar to the screen below. They will also receive an e-mail after purchase with a link to download the file as well. One downside is that follow-up e-mail can't be customized with html to match your other e-mail templates, it can only be pretty basic with a few variables and the same e-mail is sent regardless of the download purchased, so it has to also be very generic.

Email Template Editor by Klaviyo
Just counted, there are 17 different e-mail templates you can set up. That is a ton! There are 10 that we have customized. Klaviyo makes it super simple. They already have a great starter template custom for Shopify that you just have to tweak with your logo and colors, etc. Once you've tweaked the template to perfection you simply copy the html code Klaviyo creates for you and paste it right into Shopify - super easy and user friendly. I recently purchased something from a pretty well known store that also uses Shopify, and they hadn't customized any of their e-mails, but still the default Shopify e-mails, I was not impressed. Such a simple thing to do that goes a long way when it comes to professionalism.

Shopify Order Printer by Shopify
For all orders purchased through our website we like to print a packing slip/invoice for a couple of reasons: 1. easy for us to reference shipping address, 2. easy way to include a short note and our contact information in the package, and 3. it makes us look legit! The Shopify Order Printer makes this easy. There is a default template already set up and with some basic html code knowledge you can easily customize it with your logo and notes. You can have multiple templates set up for different types of orders as well.

Privy - Free E-mail Pop-ups by Privy
We read an article about how pop-ups, although very annoying, are very effective. So even though we are both slightly annoyed by pop-ups we decided to add one to our website. As payback when you fill it out, you get a discount code! Win-Win. Privy is very easy to use and manipulate. We have it set up to accept Newsletter subscriptions, and it syncs seamlessly with our MailChimp Newsletter list. And even though it sometimes even annoys us, we've seen real results. Check out last December when we launched the pop-up; the "Import" category is strictly from our Privy pop-up.


Quick Announcement Bar by Hextom
This is our most recent addition. We wanted a way to announce big ticket items at the very top of our website. We wanted something simple and easy and the Quick Announcement Bar by Hextom is just that. There are some basic templates already set up but you have the flexibility to change the colors and text to match your template. You can specify which pages of your website it will be visible on as well. And if you upgrade to their premium plan (not free) you can have rotating bars for multiple announcements.


Hopefully one of these can be useful to your shop! What apps do you use? Any we should check out? We are always looking for new additions to help improve our website.
Check out Shopify's blog post regarding the top 20 most popular free Shopify apps here.
Lessons Learned: Binding Types May 26, 2016 08:00
At UPstudio we pride ourselves on jumping in to every new product and really diving in to all aspects of what we are creating. If you know us, then you know that we are both Type A, detail oriented planners, so we want to be involved with and informed on every decision about every product. The quality, color, texture, printing method, paper type, binding type, and even shipping method are all carefully considered. We do extensive research and sample testing before making final decisions, because we feel each of these decisions can really make or break a product (and we hope you can tell the difference!) Today, we're going to focus on what some different binding types are, and some reasons to choose one over another.

Binding types play an important role in design. The aesthetics of each are very different, as well as cost, how many pages are possible to be bound together, and how the book performs in the end. While some choose a binding type last, we studied these in conjunction with everything else when designing products since it affects so many other aspects.
Here are a few binding types that we considered for products, and some of their qualities:
Saddle Stitch
To create a Saddle Stitch a piece of wire is inserted through the cover and all pages and bent back to hold them all together, resulting in looking like a staple, usually at 2-3 locations along the spine. Pros - cost efficient, cover art can be continuous, Cons - less aesthetically pleasing, pages will not lay flat when opened, page number limited to ~80.
Sewn Bound
Sewn Bound is exactly as described as pages are stitched together with thread along the entire spine. Pros - aesthetically pleasing, cover art can be continuous, Cons - costly and time consuming, not readily manufactured, pages will not lay completely flat when opened, page number limited to ~40.
Perfect Bound
Pages are folded into sections and then the ends of the folded side are cut off and roughed up, in order to adhere to the glue, which is applied along the entire spine to the wrap-around cover. Pros - aesthetically pleasing, cost efficient, pages will lay completely flat when opened (if page count allows), page capacity of ~200 pages, cover art can be continuous, Cons - when more than ~60 pages are included, pages will not lay completely flat when opened. *This binding type is used on the UPstudio Journal!
Hardcover
Hardcover binding includes several steps, with interior pages being sewn together in sections, and then glued along the entire spine to the hard cover of the book. Pros - aesthetically pleasing, page capacity of ~400 pages, cover art can be continuous, Cons - costly, pages will not lay completely flat when opened.
Spiral Bound
For Spiral Binding, holes are punched through pages of the book and held together with a circular plastic coil. Ends are crimped to prevent the coil from sliding off. Pros - cost effective, pages will lay flat when opened, book can turn back on itself and lay flat, page capacity of ~250 pages, many color and size options, Cons - less aesthetically pleasing, cover is divided and not continuous.
Wire-O Bound
Wire-O Binding is very similar to Spiral Binding, the difference being in the quality of the binding itself. The wire coil is much more durable than plastic coil noted above. Pros - aesthetically pleasing, pages will lay flat when opened, book can turn back on itself and lay flat, page capacity of ~250 pages, many color and size options, Cons - less cost effective, cover is divided and not continuous. *This binding type is used on the 2016 UPstudio Planner!
There are other binding types out there, but these are the ones that we run in to the most for product development. We hope you learned a little bit more about binding types, and how important they can be!


Lessons Learned: Business E-mail Addresses April 21, 2016 08:00
There are many small things you can do when starting up a company that make people take your company a bit more seriously. Ways to help you "fake it until you make it." One of those small things is setting up a company/business e-mail.
Our real e-mail address: upstudio.nc@gmail.com
Our advertised e-mail address: hello@upstudionc.com
Doesn't the company one appear a little bit more polished, make us seem more legit?
Typically the place that hosts your website domain will have some sort of system to help you set up a business account. So, if you already have your website set up, start there. If you are looking for a good host, we highly recommend using Google Domains, just $12 a year.
One of the free services Google Domains offers is what they call "E-mail Forwarding". You can set up alias e-mail addresses that all come to your actual e-mail address. You can setup up to 100 aliases. Note that with the free service all of your aliases are directed into an existing e-mail address, so for us they all go to upstudio.nc@gmail.com. If you want to upgrade this, you can have separate accounts set up (instead of aliases) through Google Apps for businesses for $5 a user. We are a cheap start-up so we just use the "E-mail Forwarding". When we put our professional looking e-mail on our business cards, no one knows the difference, and we are okay with all the e-mails flowing through the same place, easier for us both to see everything that is going on, feel the pulse.
If you are a fellow Google Domain user here is a quick tutorial on setting up E-mail Forwarding....
First log into your Google Domain's account (go to https://domains.google/).
Your screen should look like this:

First click on the DNS icon and confirm that you have chosen to use the Google Name Server. If you haven't, E-mail Forwarding won't work for you, sorry. (If you haven't, please tell us why you haven't, we aren't really sure of reason not to, please enlighten us...)
Next, click on the e-mail icon. You should then see the screen below, where you can type in whatever alias addresses you so desire...

You can see that we actually have our own personal aliases if we want to get super snazzy! Also note that we have one listed as "*@upstudionc.com". This is what they call a wildcard, which means that anything else someone chooses to send their e-mail to that ends with "@upstudionc.com" will also be forwarded to our upstudio.nc@gmail.com account. Example, if someone decides to send an e-mail to thisblogisawesome@upstudionc.com, we'd get it in our inbox.
Google Domains will then send a confirmation e-mail to the recipient address to finish the set up. (If the recipient address is the same as the one you use to sign into Google Domain, this step is skipped.) You are now ready to send a test e-mail!
So, that was easy, right? Now the fun begins...
When we first set this up, we were so excited, we felt legit. We quickly realized that yes, people could e-mail us at our new fancy e-mail addresses, but when we replied to their e-mails it still said from "upstudio.nc@gmail.com", totally blew our cover. We also couldn't send newly created e-mails from our new addresses either.
How do you send mail from your forwarded e-mail addresses you ask? Let us walk you through it..
Log into your Gmail account, click on your user icon on the top right of the screen and select the "My Account" button.
Under "Sign-in & security" click on "signing in to Google".
Under "Password & sign-in method" there should be a section called "App passwords." If it appears like this, click on it..

If it doesn't, it probably means that you don't have the "2-Step Verification" turned on. We personally do not have this turned on because we have two individuals using one account which makes utilizing it a little more difficult. If you're like us, go through the process of turning it on for now, and then after you complete this process you can turn it back off, no issues.
When you click on "App passwords" your screen should look like the one below (minus the fact that you probably have no previous app passwords set up).

Add a new password by selecting "Mail" for the app, and "Other" for the device. Once you select "other" it will ask you to name the device, enter the name of your domain, so for us it is "upstudionc.com". You will then be given a new app password (found in the yellow box):

WRITE DOWN THE PASSWORD! You will need it in a few short steps. If you are setting up multiple e-mail address at once, generate 1 password for each e-mail address that you want to send e-mails from. Example: We will never send e-mails from our "wildcard" e-mail address, so we didn't generate one for that.
Exit out of all of that an return to your regular Gmail inbox. (When exiting you can turn off the "2-Step Verification" if you choose, it won't need to be on for the remaining steps.)
Go to your settings screen by using the gear icon on the top right of your Gmail inbox:

Click on the "Accounts and Import" tab. Go to the "Send mail as:" section and click on "Add another e-mail address", a screen will pop-up that looks like this:

In the "Name:" field add the name you want people to see when you send e-mails from the new alias address. In the "E-mail address:" field at the new e-mail address you set up on the "forwarding e-mail" screen.
On the next step the boxes should read:
Then click "Add account". You can then repeat this for each address you set up. You can only use each app password once, but it doesn't matter which one you use for which e-mail address.
Once you have completed this step you should receive an e-mail in your inbox with the subject "Gmail Confirmation: Send Mail As (fill in new e-mail address here)". There will be directions in the e-mail for you to confirm the new addition. Simply clicking on a link and inputting a confirmation code. Once you complete this step for each address, you should be G2G!
Now, when creating a new message or replying to a message you can choose the e-mail address your e-mail will be sent from by using a drop down in the "From" field:

In the "Send mail as:" section in your settings you can set up your default send from address. Helpful if you always want to send from a certain address, don't have to use the drop down each time.
Note that if you are iPhone users like us, the default iPhone e-mail will only allow you to send e-mail from your actual e-mail address. In order to use your aliases download the Gmail app for your phone.
Hopefully our instructional was easy to follow (and crossing our fingers we didn't leave anything out), but please comment with any questions you might have or if you run into any trouble! Good luck!
Lessons Learned: LLC or S Corp? March 17, 2016 08:00
Lucky for you, a St. Patrick's day FLASH SALE is currently going on in the shop. 2016 Planners are only $10.08 and 2016 Typeface Calendars are only $5.04. Snag them for yourself and a friend while supplies last! Enter discount code LUCKYME at checkout. (On our website you can only use one discount code at a time. So those pesky cents are a result of us wanting you to be able to purchase both a planner and calendar in one haul!) Sale ends at midnight tonight EST (3/17)!
Last week, thanks to Becky, we had a "really personal" blog post. Don't know about you, but I enjoyed it, the honesty, the vulnerability, and I really needed that reminder, I am never alone and I am not in control!
So, I've been slated with following that act with a technical lesson learned, so definitely a change in pace, and probably SUPER boring for most of you. But again, to the person that finds it helpful, you are very welcome!
Once you've decided to take the plunge and start a company one of the first things you have to do is make your company "legal". In order to do that, you have to decide what type of business or structure you will have. For a small start-up company like us it really boiled down to a Limited Liability Company (LLC) or an S Corporation (S Corp) (the two most popular organizational forms today). Today I'll discuss the similarities and differences between an LLC and an S Corp.
Let us first say that choosing the type of structure (LLC, S Corp, or C Corp) for you company is confusing at best. There is no right answer, the question is what is the best fit for your company now and what will set you correctly regarding your future goals. Each state might also have different rules that come into play. That's why you'll want to get some input from a respected accountant and/or attorney to help aid your decision. We are just sharing what we have learned along our journey (please correct us if anything we have learned is incorrect).
Lets get this party started with some definitions..
LLC: A limited liability company (LLC) is an unincorporated association, a hybrid entity that combines the tax flow-through aspects of a partnership with the liability protection of a corporation or a limited partnership.
S Corp: Named after subsection S of Chapter 1 of the Internal Revenue Code. An S Corporation is a special hybrid type of entity, the S corporation elects to have a different tax treatment than its traditional C corporation cousin. For most purposes, an S corporation is not a separate type of corporation. An S corporation operates in the same manner as a regular corporation except it typically eliminates the the risk of double taxation.
Corporation: A corporation has a legal status or existence that is separate both from the individual(s) who forms it and its owners (stockholders). The objective of incorporation is to create a separate corporate entity with all of its attendant attributes, such as the independent right to own corporate assets. Income is taxed at the corporate level, and, if dividends are distributed, at the individual level as well (where the risk of double taxation comes into play).
Similarities between an LLC and an S Corp...
- Both are separate legal entities created by a state filing.
- Both provide liability protection for their members/sharholders. This means your personal assets will be protected against debts, losses, and any court rulings against your business. You can't be financially responsible for more than your investment in the company.
- An LLC and an S Corp are both pass-through tax entities which means the income, losses, tax credits, and other tax items of the business flow through to the shareholders/managers and no income taxes are paid at the business level.
Some differences...
- When first registering your company in the state of North Carolina it costs $125 to register an LLC and an S Corp. However both require filing of an annual report, $25 for an S Corp and $200 for an LLC in North Carolina. So an LLC costs more to maintain. Not sure how that shakes out in other states.
- S Corps require a little more paperwork and are a little more difficult to set up.
- To raise capital, corporations often sell stocks. LLCs can only sell interests in their company.
- S Corps have strict rules for how to remain compliant. Required formalities include: adopting bylaws, issuing stock, holding initial and annual director and shareholder meetings, and keeping meeting minutes with corporate records, etc. LLCs only have recommended formalities. In fact, with an LLC Operating Agreement you can essentially create the management structure of your choosing.
- An LLC beats an S corporation for flexibility in allocating percentage of profits or losses among the owners.
- LLCs are not recognized outside of the United States typically.
- Non-U.S. citizens/residents can be members of LLCs; S corps may not have non-U.S. citizens/residents as shareholders.
- S Corps can only have 100 shareholders, LLCs have no limitation.
- The owner of a single member LLC doesn't have to file a tax return for the LLC, as they only report the activity on their personal tax return.
- Single member LLC owners are required to pay self-employment tax on income generated in the LLC.
- The key advantage of an S corp is that it offers tax benefits when it comes to excess profits, known as distributions. The owner can be treated as an employee and paid a reasonable salary (tied to industry norms). FICA taxes are withheld and paid on that amount. Then, any remaining profits from the company can be distributed to the owners as dividends, which are taxed at a lower rate than income.
- LLCs have more flexible tax reporting options. S Corps must file taxes as S Corps, as an LLC you can elect to be taxed as an S corp while retaining the structure of an LLC.
Based on all the facts above we chose to be a Partnership LLC but elect to be taxed as an S Corp.
- By default since we are an LLC with more than one member we are treated as a partnership LLC. No choice there.
- We don't have anything squirrely going on with our percentages, everything is 50/50, gains and losses.
- We don't plan to find investors any time soon (especially not from overseas).
- We get the flexibility of how we want to organize our company.
- There are less formalities and paperwork associated.
- We can still choose to file taxes as an S Corp so we get the tax benefit listed above regarding additional profits. (Note: in order to be eligible to do this you have to meet some of the requirements of an S Corp, see the instructions for further explanation.)
Two final lessons learned (very fresh.. we learned them this week... and it involved a last minute dash to the post office)...
- LLC tax returns are due by April 15th. S Corp tax returns are due by March 15th.
- If you are an LLC electing to be taxed as an S Corp you must file Form 2553 (instructions) by March 15th of the year the election is to take effect. Example: to effect your 2016 taxes (to be filed March 15th, 2017), you must file Form 2553 by March 15th, 2016. There are some special circumstances, and there is relief if you miss the deadline (all is covered in the instructions link above).

Resources to Learn More:
- LLC vs. S Corp - Which Business Type is Right for Me?
- LLC Electing S Corp Status -- The Best of Both Worlds
- LCC vs. S Corp
- What business type is right for you?
- Should your business be an LLC or an S Corp?
- A Comparison of the Limited Liability Company and the S-Corporation
Resources in North Carolina to Set Up Your Business:
Lessons Learned: Shopify Blog Images Not Showing Up in E-mail Subscriptions February 18, 2016 08:00 7 Comments
Some quick announcements:
- Planners and calendars are 40% off! Snag one before we run out!
- So remember that time we filmed a video flipping through the UPstudio Planner to help you all visualize the layout? Well, we found another solution (which was way easier than filming a video..whomp whomp). Flip through a sample here, or on the planner product page.
We have learned so much about starting a business, creating a website, creating a product, finding suppliers, (the list goes on and on) since we launched UPstudio last year. That being said, we have decided to start a blog series sharing things that we've learned on our journey that we think could be helpful to others. We plan to post once a month sharing something that we have learned or figured out. These posts might not interest all of our readers, but for the one person that is going through the same struggle, you're welcome, and good luck!
We use Shopify as the platform for our website (in a future post we will share why we chose Shopify instead of all of the other options out there). We use one of the free website templates with some added applications and coding.
One of the factors that played into us choosing Shopify is that it offers blogging along with e-commerce capabilities. We understand the power of a blog and we felt it was the best way for us to share our story and share more about our products. There is so much that we have figured out in regards to our blog but today we are focusing on images in e-mail subscriptions.
We have supporters that aren't on social media and aren't typical blog readers that want a way to know that we added a new blog post. An easy solution is to send our blog out via e-mail for those that sign up. The best free options we found to do this were FeedBurner and MailChimp. In the end we chose MailChimp because we liked that there was more customization regarding the e-mail appearance. There are easy tutorials on both websites showing how to set up your subscription, just click on the links above. You can sign up to receive our blog via e-mail here.
We set up everything in both platforms to test out how the e-mails came through and to see what we liked and didn't like prior to advertising this service. Everything looked great, except our images weren't coming through on either platform. Lets be honest, no one wants to read a blog post with no pictures.
Example:
A sample of a previous blog post:

How it showed via e-mail with the FeedBurner e-mail subscription:

How it showed up via e-mail with the MailChimp e-mail subscription:

So, yea, not good... We proceeded to scour the internet for answers, trying every little thing we came across, all of which didn't work, leading us to believe we were in the minority. So, we asked the question, how is our blog different from the average blog out there? The light bulb moment: We are hosted by Shopify instead of a typical blog platform like Wordpress, Blogger, or Tumblr. So we change our focus to the Shopify forums (uber helpful if you haven't checked them out). We finally came across this discussion which explained our issue and had a simple fix. (This one paragraph covering like 3 months of searching and experimenting seems anticlimactic. For us, finding this forum, was like finding a gold mine.)
Summary of what we learned and how to fix it:
The blog feed (RSS) from Shopify sends your images protocol-less. The easy fix is to manually add the "https:" protocol to the source code. (Note that there are apps in the Shopify store that do this for you if you have have tons of pictures. These apps however cost money, so not an option for us.)
In layman's terms: When MailChimp or FeedBurner was reading our blog feed from our website there was an error. Our website wasn't explaining the location of our images correctly, so MailChimp or FeedBurner couldn't find them. So we just had to fix the explanation.
How to fix the issue:

When placing the picture above into our blog post, the html code that Shopify automatically generates looks like this:

In order for MailChimp, FeedBurner, or any other e-mail subscription program to locate your image file you simply add the text "https:" to the code. Do this by clicking on the "<>" button in the formatting menu:

Find the code regarding your picture and add the text in the following location:

To get out of the code just click on the "<>" button. You will notice that nothing in the view area has changed at all. The only difference is now MailChimp, FeedBurner, or whatever platform you are using can now find your image to display. VOILA!
All of your images are stored within your site with their own link address. Essentially all you are doing is completing the link address so that your image can be found. So if you need a reminder of what text to add in your code, just find the link address for you image by going to Settings-> Files and finding that image.
Example:

Hopefully you could follow our fix explanation. For all those coding geniuses out there, we probably didn't use all the correct terms, so we apologize.
Hopefully this helps fellow Shopify bloggers!
(Now let us go add the "https:" to all our images in this post so you can see them in our e-mail!)
Paper Weights and Printing Behind the Scenes July 31, 2015 11:04
By day we are an architect and an engineer. So we are comfortable in the design world. But when it comes to our new endeavor (UPstudio) there are many hats that we have had to put on that we aren't so comfortable with yet. We've had to be business ladies, marketing ladies, researchers, website developers, the list goes on and on. We have learned so much already and we continue to be educated every day by all of the people helping us along the way (and by google).
Since our first three products (calendar, everyday cards, and the planner) are paper products the first thing we had to be educated on was paper and printing.
We won't bore you with all the information we have learned, but we did want to talk about the two big things in regards to paper and printing that drove our decisions: 1: Paper Weight and 2: Digital Versus Offset Printing.
Paper Weight:
We learned that are many ways to measure the weight of paper. The most common way is the U.S. Basis Weight. This was a little hard for us to wrap our head around at the beginning because the same paper can yield different values based on the “Basis Weight” applied while manufacturing the paper. The most common are Bond, Text, Book, Cover, Index and Tag. Higher values don’t always equate to heavier/thicker print media. For example, a sheet of 100lb Text paper is actually much thinner than an 80lb Cover stock. We learned Cover stock was our best option because it is the thickness and would give us the most durable products. We decided on 160 lb cover stock for our Everyday Cards and 130 lb cover stock for our Calendars after looking over tons of samples. The “Basis Weight” is defined as the weight of 500 sheets of paper in its basic unit uncut size. An uncut sheet of Cover paper is 20 x 26 inches. So our 160 lb cover stock really means that 500 sheets sizing 20" x 26" weighs 160 lb.
(Are we boring you yet? If so, feel free to scroll down to the cool behind the scenes pictures of our offset printing!)
Digital Versus Offset Printing:
The two most common commercial printing technologies are digital printing and offset printing. Offset involves a mechanical process of applying layers of ink to paper with a series of rollers. The printing plate (containing your design) is mounted on a roller. Ink and water are applied to the printing plate. The ink binds to the part of the plate that contains design elements; the water is applied to the white space portion of the paper. Oil is mixed with the ink to ensure that the ink and water repel each other and there is no smearing or blotchiness on the finished product. The plate cylinder transfers, or offsets, the design onto a rubber blanket roller, which in turn transfers the design onto the paper. When doing multiple colors, each roller would have it's own specified ink – Cyan, Magenta, Yellow and Black — or CMYK. As each of these rollers pass over the page, they transfer ink and build layers of colors, resulting in complete images and text on the page.
Digital printing eliminates the numerous steps involved in the offset printing process, such as creating films and plates for ink rollers. Most digital presses today apply ink in a single pass from a single ink head, similar to common inkjet printers found in homes and offices.
There are many pros and cons of both technologies. The three biggest differences that applied to us were:
- When printing large areas of one color on a digital printer the ink has a sheen to it even if you print it on smooth matte paper. That wasn't really the look we were going for with our large black printed areas. We really wanted a matte finish.
- Most digital printers can only handle cover weight up to 120 lb, some up to 130 lb.
- Offset printing is usually more expensive by a considerable amount. (Makes sense right based on the process descriptions above.)
So, based on all our research we felt like the parts of our product that were printed in mostly black should be printed offset so that we would get the matte finish we desired. Everything over 130 lb weight also had to be printed as offset. This meant our only option for the Everyday Cards was offset printing. But for the Calendars we decided to print the back offset and the front digital, to save some money. This drove the choice for the 130 lb paper, because that was the max the digital printer could take.
We researched and vetted all of the local small format printers we could find in Raleigh in search of the best price and the best customer service. In the end we went with Commercial Printing Powered by AlphaGraphics. They actually do their offset printing in house and they were nice enough to send us some pictures of our Everyday Cards and Calendars being printed.
The plates made for the offset printing:
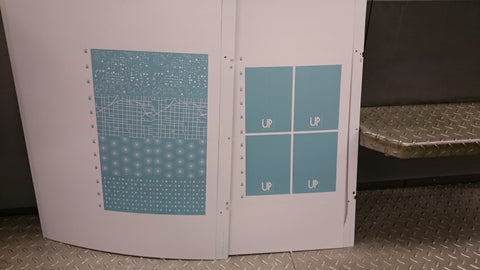
Some offset process photos:


Final sheets prior to cropping (look just like the plates):


Again, we just hit some of the key points today, but if you are thinking about getting into paper products or are just curious about other aspects feel free to comment below with questions or shoot us an e-mail. We are no experts, but are more than willing to share the knowledge we have.
-- Mary Beth and Becky